Create a booking
Add an appointment to the calendar from the Dashboard for a fast walk-in booking, or from Bookings for a full booking with recurrence.
There are two ways to put an appointment on the calendar: a fast Quick book from the Dashboard, or a fuller New appointment form from Bookings that also supports recurring series.
Before you start
- You need at least one service and one employee set up before you can create a booking.
- A card terminal or Stripe connection isn't required — bookings work with or without online payment.
Quick book from the calendar
-
Open the Dashboard.
-
Click any empty time slot under an employee's (or bookable resource's) column.
-
In the Quick book dialog, search for an existing Customer, or click New customer and fill in their name, email and phone.
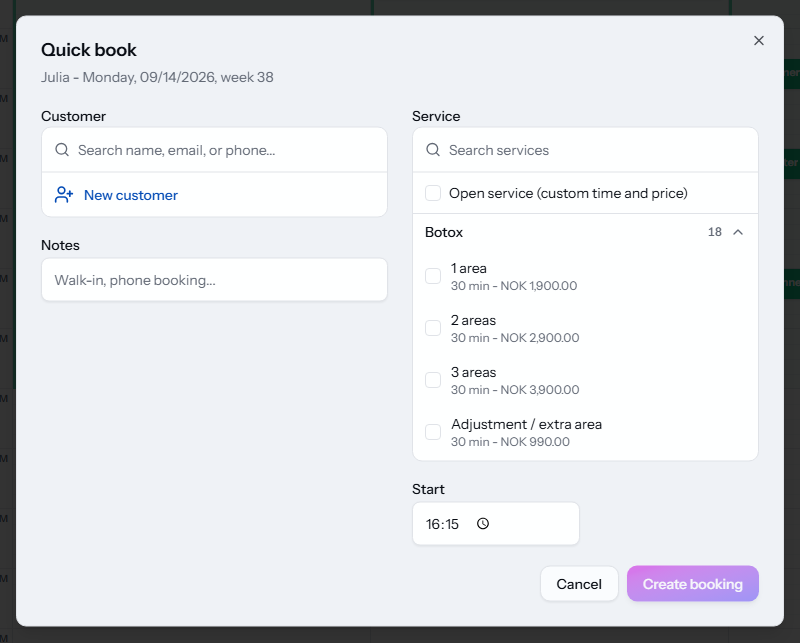
The Quick book dialog open from an empty calendar slot. -
Choose a Service. If the visit doesn't match a set service, pick Open service (custom time and price) instead and set an End time and Price yourself.
-
If the service needs an employee and you didn't click a specific column, choose one under Employee.
-
Adjust Start if needed, and add a note — the Notes field is a good place for "Walk-in, phone booking..." style context.
-
If the customer has a phone number on file, tick Send booking confirmation by SMS to text them the details right away.
-
Click Create booking.
Find another day from the calendar
The compact date strip directly below the Dashboard calendar shows how full each available day is. It loads after the calendar, so you can start working while the availability figures are still loading.
- Today starts near the left edge, with yesterday and part of the previous day still visible. Click a date to switch the calendar to that day.
- Use the single-arrow buttons to move one day and the double-arrow buttons to move one week. You can also swipe the strip or move through its controls with a keyboard; there is no separate scrollbar.
- Month and year labels appear where a new month starts. The smaller labels show ISO week numbers.
- Gray dates are days off. On an available date, the bar shows the percentage of working time already booked.
- Hover over a date, or focus it with a keyboard, to see the booked percentage, booked and available hours, and the breakdown for each selected employee or resource.
The strip follows the employee and resource calendars you have selected. Its figures refresh when appointments change.
New appointment from Bookings
Use this form when you're booking multiple services in sequence, need to set the visit status directly, or want a recurring series.
-
Click Bookings in the sidebar.
-
Click New appointment.
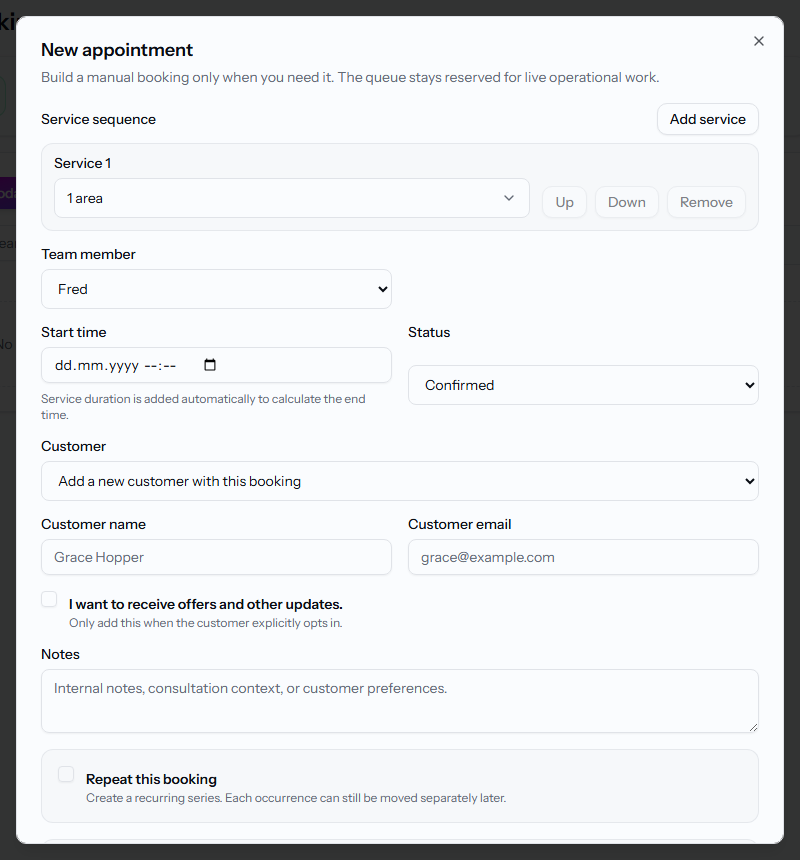
The New appointment dialog with the service, team member and customer fields. -
Under Service sequence, pick a Service, or click Add service to book several in a row. Each service can be Performed by a different team member than the one on the booking.
-
Choose the Team member, Start time and Status.
-
Pick an existing Customer, or leave it on "Add a new customer with this booking" and fill in Customer name and Customer email.
-
Add Notes if needed.
-
To book a series, tick Repeat this booking, then set Every / Cadence (weeks, months or years) and either Occurrences or Or end date.
-
Click Create appointment.
Once the booking exists, see Move, edit or cancel a booking to change it later.
Related articles
Move, edit or cancel a booking
Reschedule a booking by dragging it or through the Move booking dialog, change its details, or cancel it and record a reason.
Booking statuses and check-in
Understand what each booking status means, where bookings that need attention collect, and what to do when a customer arrives.
Online booking settings
Control how far ahead customers can book, what details they must provide, and whether they pay a deposit, the full price, or nothing at booking.
Add and manage customers
Build your customer directory, search and filter it, and find customers who haven't booked in a while.